Pages

Friday, February 24, 2012

Bare Necessities!

OK I said I would talk about my very sad nails and what I'm doing to try to repair them. Any thoughts you have would be much appreciated! Here is a pic from about 2 weeks ago. I'll take another soon. I'm trying to get a view about every 3-4 wks to see how they are doing. (Next time in day light hopefully)


Not sure how much you can tell but I have peelin
g, stained nails and rough cuticles. I got on polish blogs with http://www.fashionpolish.com/ and turns out she had nails like I do now. I'm using some of the stuff she listed as her mani routine. Some is a bit different. So here it is

Cuticles:
Sally Hansen 'Problem Cuticle Remover' with aloe. I noticed an almost immediate difference in my cuticles with this.
Burt's Bees: Lemon Cuticle Cream. I try to remember to use this daily but I often forget. :(

Nail Bed:
Left Hand: Nail Tek Foundation II - this is made to go under nail polish
Right Hand: Naltiques Formula 2 - I was told not to use nail polish with this (hahahaha! so silly!) but found another blogger who does. I'm trying it. Can't hurt!

Now for some added fun. I've seen the heart tutorial floating around and just had to try it!


Wednesday, February 22, 2012

Blue Me Away

Today is all about BLUE!!! And Sparkles!!! I somehow keep buying nail polish that is about the same shade of blue. I guess that means I really like this color!! (Who Knew?) I painted my nails yesterday (in a rush) and at first this blue seemed a bit bright for me. I'm not used to such a bright color or this color family. I added the glitter which made me very happy! :) So here is today's photo.

Polishes:
OPI: Teal the Cows Come Home
OPI: Gone Gonzo!
Ring Finger:
OPI: Save Me


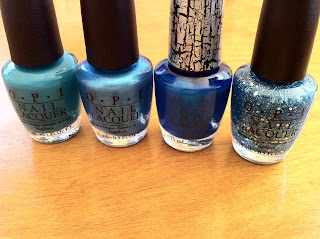
So now for my Blue Collection!
(This is not all of my blue, just the 4 that are really close)

From Left to Right
Fly (Creme)
Teal the Cows Come Home (Shimmer)
Turquoise Shatter
Gone Gonzo! (Glitter)

Saturday, February 18, 2012

Nail Art: Third Time's A Charm!

Harry Potter Nails!

I mentioned in my last post that I had already done my nails again and I'm very happy with the result. Not perfect by any means but definitely a step in the right direction! I've had people comment on them and they are always impressed I did them myself. ;)

How they came about: I recently ordered "The 'It' Color" by OPI online. I've wanted this color for a while but when I couldn't find it locally I went ahead and purchased from an Amazon seller. (Of course, after buying online the next time I walked into Ulta it was right there! Ugh!). It came in the mail after my polka dot attempt and was next in line for my nails! Super Excited! I went to go get 'Vampsterdam' but decided it was too purple for me so got a different color and decided to pair it with the golden yellow. I've wanted to try using tape for my Nail Art Mani and found my scissors for it. When I saw the jagged one I thought it would go perfectly with my yellow polish and I could do a lightning bolt. This is the result!


So now for the Polishes
OPI: Base Coat
OPI: The 'It' Color
OPI: Diva of Geneva
OPI: Top Coat
Ring Finger:
OPI: OPI Inc.
China Glaze: Lighthouse


The OPI color 'Diva of Geneva' is a really cool maroon/fuscia/dark purple kind of color. You can see how it changes from an indoor yellowish light to outside light. Loves it!


Method: I used 2 coats of 'The It Color' (This polish is thick but doesn't go on evenly. 2 coats is a must!) and once that completely dried I started the 'artistic process.' I used regular tape (I might try painters tape at some point.) and my fancy scissors to cut the tape. I did the lightning bolts first. I cut the tape really thin and at a slight angle. I painted 1 coat of 'OPI Inc.' and then used tweezers to peel off the tape. *Note: take tape off immediately and DO NOT allow to dry because it will leave a fuzzy line! (Like I said, not a perfect mani!). I then proceeded to do the rest of my nails. :) As a design note: you will see that I placed the top of the tape at the middle/top of the fingernail. This turned out much better for the jagged lines. I didn't take a picture of my left hand because of the fuzzy lines and bad placement of the tape. The very last step was to use a teeny tiny paint brush to fill in the lightning bolt on my ring finger with the sparkly gold color!

Thursday, February 16, 2012

Nail Art: Round 2!

So now that I've gotten into nail art using polish and not just stickers I feel like I can't wear just one color. I love lots of color and have lots of polish and feel I should always wear at least 2 colors! Today I tried to go with polka dots and french tip mani. This did not turn out so well but could have been worse. Firstly, I thought I purchased a really hot pink but instead it was Red! Secondly, I glooped too much of the red onto my nail. Oh well. Better luck next time!

I used:
OPI: Natural Base Coat
CHI: Wish Upon a Mercury Shooting Star
Nicole: Give Me the First Dance
OPI: Red Hot Ayers Rock
OPI: Top Coat

Tiny paint brush from a craft store for the dots and line at the bottom.

About my polishes- The Nicole polish is like a crazy foil silver! I have 2 CHI polishes but they are so thin you have to use at least 3 coats and even then its still too thin. I always like to use one layer underneath my sparkle polishes so its not so hard to take off. I have CHI in both brown and silver (used here) and they are destined for this job. The brown goes well under any dark golds or purples.

I'm seriously behind on my posting because I've already done my nails again and I'm loving them! Still not perfect but the closest I've gotten! Third time's a charm!!!

Sunday, February 12, 2012

Nail Art: First Attempt

I've always associated nail art with fake nails but a friend showed up to work one day with cute little trio sets of dots that she used a nail art pen for. I went and bought one. ;) And, some nail art stickers. Pinterest has inspired me into thinking I might be able try out my own nail art so here's how it turned out. I used similar colors just in case it went horribly wrong. Thankfully it was pretty ok.

I used OPI: Cozu-Melted in the Sun and then I used a Q-Tip to apply OPI: Pros & Bronze. I also used OPI natural base coat and top coat (as always!)

And yes, I have bad nails. But more on that later. :) My increasing interest in polish has also inspired me to take better care of my cuticles. We shall see how this goes. But I'll save that for another blog entry. :)

Friday, February 10, 2012

Here goes nothing... again

I keep trying to blog and it never goes anywhere. It never seems to fail. The New Year brings lots of ideas and no time to pursue them. A year later I haven't published any new patterns (but have worked on many) and my head is bursting with knit patterns that want to be realized. Some old and some new.

I've recently realized a new addiction. Painting my Nails! I've come across some nail blogs which get me inspired and somewhere along the line I became an OPI snob. It all started when my grandmother decided to treat me to a manicure. The color I chose was by 'China Glaze' but ended up buying an OPI color instead. (I was disappointed when I discovered it was the wrong polish). I ended up getting the correct shade by China Glaze but the polish didn't last like OPI did. And thus began my polish obsession. I think this was summer 2010 and a year and a half later my nail polish collection is massive! And, of course, mostly OPI. :)

So- This blog started with knitting a year ago and now its extended to nail color and who knows what else. I like to layer my polish because I like lots of color!